

Learn React Portals like a PRO.
Learn React Portals, why do we need Portals, and learn how to implement it.


We know that every thing in react is rendered in "root" DOM node i.e.
<div id="root"></div> because we're rendering the "App" component inside root DOM using following code ReactDOM.render(<App/>, document.getElementById('root'));
What if we want to render a component out of the root container or root DOM node? Here comes React Portals into the picture, React Portal helps in rendering the child component outside the root DOM node, which is outside the parent DOM hierarchy.
The most common use cases of Portal's are Modal Dialog Boxes, Tooltips, Hovercard, loaders, chat widgets in the cases the component needs to visually break out of the parent container and show up on the screen non-relative to its parent component. It is beneficial when the parent component has ‘overflow: hidden’ or ‘z-index’ styling.
A Portal can be created using
ReactDOM.createPortal(child, container)
Here, The first argument (child) is any renderable React child, such as an element, string, or fragment. The second argument (container) is a DOM element.
We need to create a new DOM node in the public/index.html file as shown below to render React component inside it using React Portals.
<div id="root"></div> <!-- this is root node -->
<div id="portal-root"></div> <!-- this node is for portal-->
Now let's implement a simple modal using React Portals,
Create a new file modal.js and add the following code to this file.
export default function Modal() {
  return <div>Modal Portal</div>
}
Modal is a simple component that just shows a text "Modal Portal" now add it our App.js file as show below
import './App.css'
import Modal from './components/modal'

function App() {
  return (
    <div className='App'>
      <h1>Hello World</h1>
      <Modal />
    </div>
  )
}
export default App
App.js is a simple Component that just renders a <h1> tag and the <Modal/> component we just created.
now if we run the code we will get the following output on the browser.

Let's inspect the code in the browser dev tool,
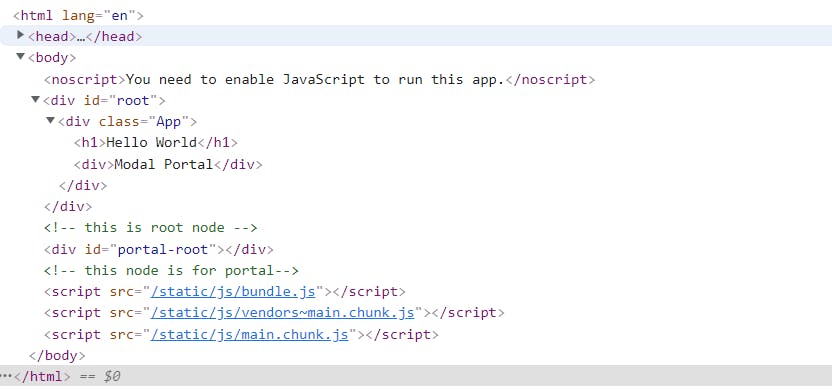
portal-root node we created is empty and has no child element.
Now to render the Modal component inside the portal-rootlet's use React Portals.
Update the code in modal.js file with the following code.
import ReactDOM from 'react-dom'
export default function Modal() {
  const portalDOM = document.getElementById('portal-root')

  return ReactDOM.createPortal(<div>Modal Portal</div>, portalDOM)
}
In the above code we've accessed the portal-root DOM node using element Id and passed it as a second argument to the ReactDOM.createPortal function, and the <div> with text "Model Portal" is passed as 1st argument, this creates a portal and whatever element we pass in the first argument is rendered inside the portal-root DOM node.
Now lets inspect the code again,
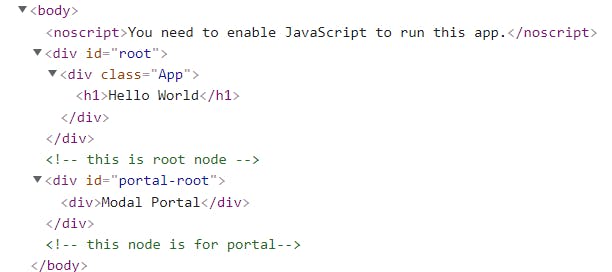
Here, you can see that "Modal Portal" is rendered inside the portal-root node.
root node consists of only the "Hello World" header tag, even if we're rendering the <Modal/> in App component.
That's the benefit of React Portals, we can render components outside the root node and access the state of root node during the execution. and control the portal-root from inside the root node.
Now add some styling to the Modal component, update the code in modal.js file with the following code,
import ReactDOM from 'react-dom'
export default function Modal() {
  const portalDOM = document.getElementById('portal-root')
  return ReactDOM.createPortal(
    <div
      style={{
        position: 'absolute',
        top: 10,
        left: '50%',
        padding: 20,
        background: 'lightpink',
      }}>
      Modal Portal
    </div>,
    portalDOM
  )
}
Here, we have simply added inline styling.
Now let's add a button in App.js to toggle the modal on and off and create a state variable using useState to store the state of modal.
Update the code in App.js with the following code,
import './App.css'
import Modal from './components/modal'
import { useState } from 'react'
function App() {
  const [showModal, setShowModal] = useState(false)

  return (
    <div className='App'>
      <h1>Hello World</h1>
      <button onClick={() => setShowModal(!showModal)}>Toggle Modal</button>
      {showModal && <Modal />}  {/* renders when showModal is true */}
    </div>
  )
}
export default App
In the above code, we've added a button to toggle the state of modal and conditionally rendered the <Modal/> component, which produces the following output.

This demonstrates that we can control the components rendered outside of the main root node from inside the root node and the component rendered using the portal can access states of the root node.
Portal continues to be a child of the root node in react tree, even if they're not the child in the DOM tree.
Conclusion
To sum it up, we spoke about what is React Portals, how it works, and why need React portals, we also implemented React Portals, Hope this article has helped you to understand the basics of React Portal, this article covers a small demo of how we can use React Portals, read more about it here Official React Docs - React Portals.
Thank you for your patience. Happy Coding :)